[Structural Pattern] 데코레이터 패턴 (Decorator Pattern)
Design Pattern / Structural Pattern
데코레이터 패턴의 정의와 해당 디자인 패턴의 예제 코드를 통한 이해 및 설명 정리
개념
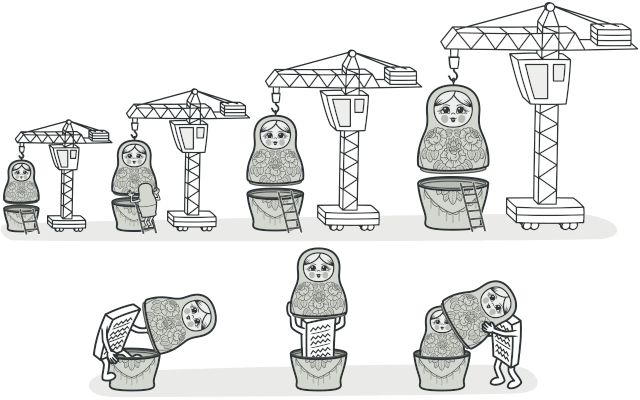
대상 객체에 대한 기능 확장이나 변경이 필요할 때, 객체의 결합을 통해 서브클래싱 대신 쓸 수 있는 유연한 대안 구조 패턴
decorator를 해석하자면 ‘장식자’라는 의미를 가지고 있는데, 마치 기본 제품에 포장지나 외부 디자인을 살짝 변경해 줌으로써 새로운 기능을 부여하는 것과 같다고 보면 됨데코레이터 패턴을 이용하면 필요한 추가 기능의 조합을 런타임에서 동적으로 생성할 수 있음
- 데코레이터할 대상 객체를 새로운 행동들을 포함한 특수 장식자 객체에 넣어서 행동들을 해당 장식자 객체마다 연결시켜 서브 클래스로 구성할 때보다 훨씬 유연하게 기능을 확장할 수 있음
패턴 구조
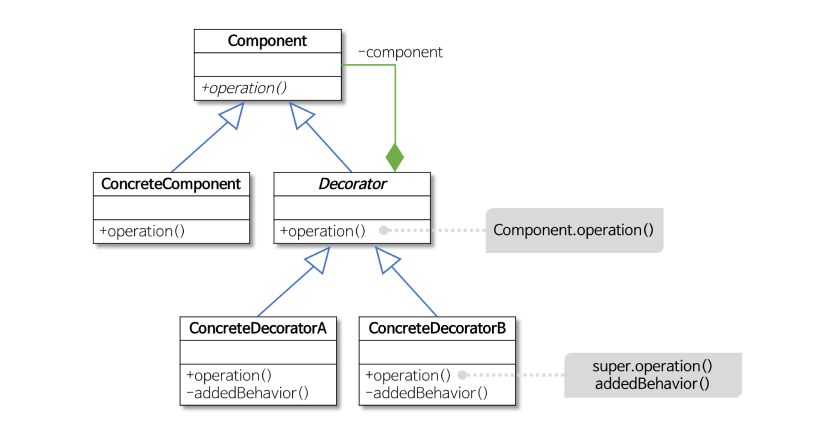
Component(Interface)- 원본 객체와 장식된 객체 모두를 묶는 역할
ConcreteComponent- 원본 객체 (데코레이팅 할 객체)
Decorator- 추상화된 장식자 클래스
ConcreteDecorator구체적인 장식자 클래스
- 부모 클래스가 감싸고 있는 하나의
Component를 호출하면서 호출 전/후로 부가적인 로직을 추가할 수 있음
- 부모 클래스가 감싸고 있는 하나의
데코레이터 순서는 원본 대상 객체 생성자를 장식자 생성자가 래핑(
wrapping)하는 형태로 간다고 보면 됨ex)
new 장식자(new 원본())
예제 코드
1
2
3
4
5
6
// 원본 객체와 장식된 객체 모드를 묶는 인터페이스 (Component)
interface Weapon {
  aim_and_fire(): void;
}

export { Weapon };
1
2
3
4
5
6
7
8
9
10
11
12
13
14
15
16
import { Weapon } from "./component";

// 장식자 추상 클래스
abstract class WeaponAccessory implements Weapon {
  private rifle: Weapon;

  constructor(rifle: Weapon) {
    this.rifle = rifle;
  }

  public aim_and_fire(): void {
    this.rifle.aim_and_fire(); // 위임
  }
}

export { WeaponAccessory };
1
2
3
4
5
6
7
8
9
10
import { Weapon } from "./component";

// 장식될 원본 객체
class BaseWeapon implements Weapon {
  public aim_and_fire(): void {
    console.log("실탄 발사");
  }
}

export { BaseWeapon };
1
2
3
4
5
6
7
8
9
10
11
12
13
14
15
16
17
18
19
20
21
22
23
24
25
26
27
28
29
30
31
32
33
34
35
36
37
38
39
40
41
42
43
44
45
46
47
48
49
50
import { Weapon } from "./component";
import { WeaponAccessory } from "./decorator";

// 장식자 클래스 (유탄 발사기)
class Grenade extends WeaponAccessory {
  constructor(rifle: Weapon) {
    super(rifle);
  }

  public override aim_and_fire(): void {
    super.aim_and_fire(); // 부모 메서드를 호출함으로써 자신을 감싸고 있는 장식자의 메서드를 호출
    this.grenade_fire();
  }

  public grenade_fire(): void {
    console.log("유탄 발사");
  }
}

class Scope extends WeaponAccessory {
  constructor(rifle: Weapon) {
    super(rifle);
  }

  public override aim_and_fire(): void {
    this.aiming();
    super.aim_and_fire(); // 부모 메서드를 호출함으로써 자신을 감싸고 있는 장식자의 메서드를 호출
  }

  public aiming(): void {
    console.log("조준 중...");
  }
}

class Buttstock extends WeaponAccessory {
  constructor(rifle: Weapon) {
    super(rifle);
  }

  public override aim_and_fire(): void {
    this.holding();
    super.aim_and_fire(); // 부모 메서드를 호출함으로써 자신을 감싸고 있는 장식자의 메서드를 호출
  }

  public holding(): void {
    console.log("견착 완료");
  }
}

export { Buttstock, Grenade, Scope };
1
2
3
4
5
6
7
8
9
10
11
12
13
14
15
16
17
18
19
20
21
22
23
24
25
26
27
28
29
30
31
32
33
34
35
36
37
38
39
40
41
42
43
import { Weapon } from "./component";
import { BaseWeapon } from "./concrete_component";
import { Buttstock, Grenade, Scope } from "./concrete_decorator";

class Client {
  public static main(_args?: string[]): void {
    console.log("유탄 발사기 장착한 라이플");
    const grenade_rifle: Weapon = new Grenade(new BaseWeapon());
    grenade_rifle.aim_and_fire();

    console.log("");

    console.log("개머리판 + 스코프 장착한 라이플");
    const buttstock_scope_rifle: Weapon = new Buttstock(
      new Scope(new BaseWeapon())
    );
    buttstock_scope_rifle.aim_and_fire();

    console.log("");

    console.log("개머리판 + 스코프 + 유탄 발사기 장착한 라이플");
    const buttstock_scope_grenade_rifle = new Buttstock(
      new Scope(new Grenade(new BaseWeapon()))
    );
    buttstock_scope_grenade_rifle.aim_and_fire();
  }
}

Client.main();
// 유탄 발사기 장착한 라이플
// 실탄 발사
// 유탄 발사

// 개머리판 + 스코프 장착한 라이플
// 견착 완료
// 조준 중...
// 실탄 발사

// 개머리판 + 스코프 + 유탄 발사기 장착한 라이플
// 견착 완료
// 조준 중...
// 실탄 발사
// 유탄 발사
참고한 출처 사이트
이 기사는 저작권자의 CC BY 4.0 라이센스를 따릅니다.